
When I first got into YouTube, I just wanted to know what the 4:2:2 on my camera meant. What the heck is it, is it an important feature, and should I be filming in it?
Let’s find out!
Chroma Subsampling is All About Compression
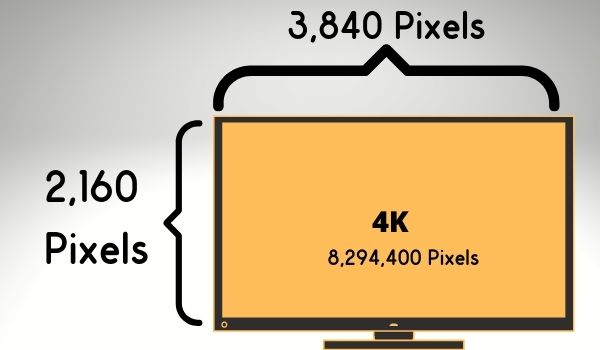
A 4k TV has 3,840 horizontal pixels and 2,160 vertical pixels for a grand total of ~8.3 million pixels.
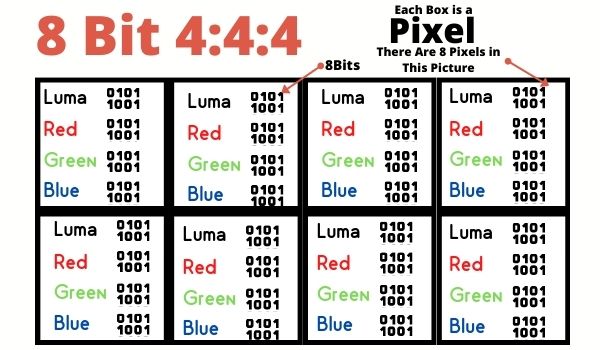
With 10-bit color, each individual pixel is supposed to store 10 bits of information for the Red, Green, Blue, and Luma (brightness) channels. A total of 40 bits of information saved per pixel.
The problem with doing that is it’d take 40Mb to store a single 4k image that way (Multiply 8.3 million pixels by 40 bits per pixel). For 24 frames per second video, it’d take ~60Gb to save a single minute of 4k video. That’s crazy!
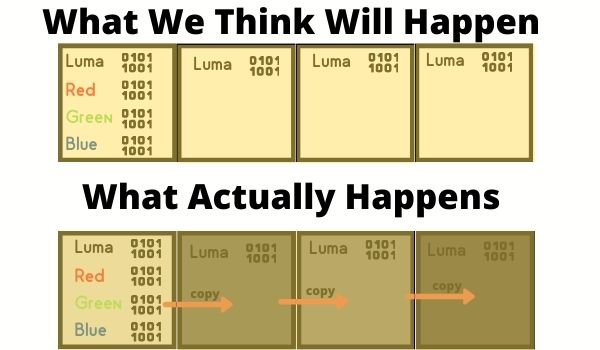
Clearly, this won’t work (Actually, it would work, but nobody has the hard drive space for it in 2025). We call each pixel getting a 10-bit value for its Luma (brightness), Red, Green, and Blue channels 10-bit 4:4:4.
Human vision is much more sensitive to brightness shifts than we are to color shifts. Color subsampling takes advantage of this by deleting some color information from the pixels above to save space. It’s hard for us to tell the difference anyway.
So, for example, 8-bit 4:2:2 would look like this for every 8 pixels.
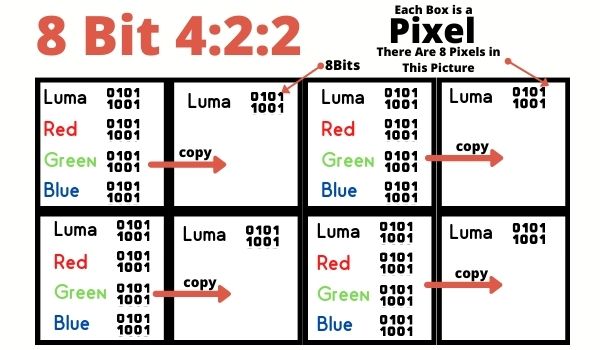
When our TVs process this image, it copies the color information from the pixels next to it rather than storing that information to disk. This alone cuts our minute of 10-bit 4k video from ~60GB to ~38GB. That’s some pretty solid compression right there!
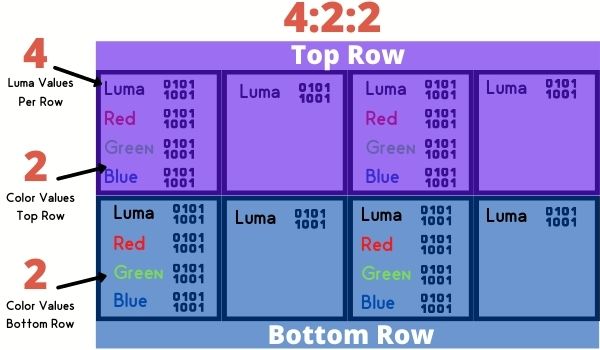
Let’s try to understand the color sampling convention if you didn’t get it from the previous example. It’s (Luma/brightness values per row):(Color values per top row): (Color values for Bottom row) for every 8 pixels on your screen.
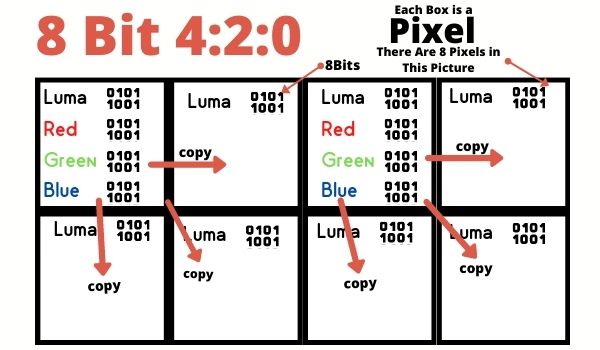
OK, given that convention, you can probably guess what 4:2:0 color sampling looks like.
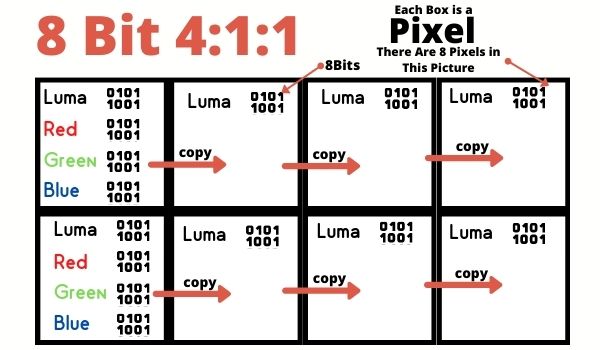
What about 4:1:1 color sampling? Well, that would look like this.
Chroma subsampling saves a lot of disk space. 4:2:0 and 4:1:1 color gets our 1-minute 4k clip down from 60Gb down to 24Gb with just color subsampling.
Now that you’ve got why color sampling is happening and what it is, let’s move on to if you can spot the difference in picture quality.
Can You Tell The Difference Between Color Sampling Rates?
You likely can’t tell the difference between 4:2:2 and 4:2:0 in most scenarios. Let’s get into the reasons why.
1) Different Luma Values Make Colors Look Distinct
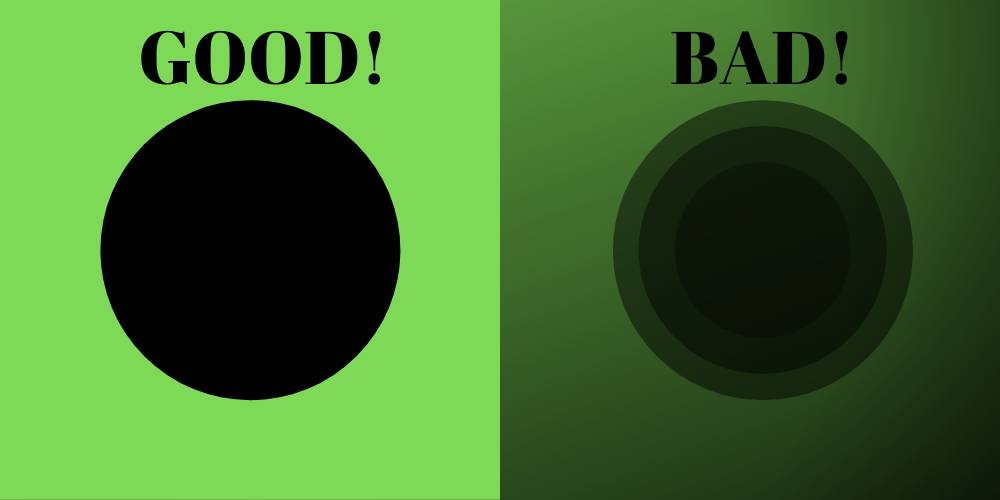
I assumed that copying a color to 3 corresponding pixels would be incredibly noticeable, but it’s not. The reason is that we kept all that Luma information for every pixel. As we alter the brightness for a pixel, we perceive the color to be quite different.
In the picture above, I gave the foreground the same color and transparency. I then changed the background from white to various shades of gray. Notice how much doing this can change the color. That’s effectively what we’re doing when we alter the luma values for a pixel but not the color.
2) You’re Probably Viewing the Video on Too Small of a Screen to Notice
A 4k television is 3,180 x 2,160 pixels. Meanwhile, a 1080p television is half the vertical size at 1920 x 1,080 pixels. So to make a 4k picture 1080, we need to delete every other row of pixels. It’d look like this.
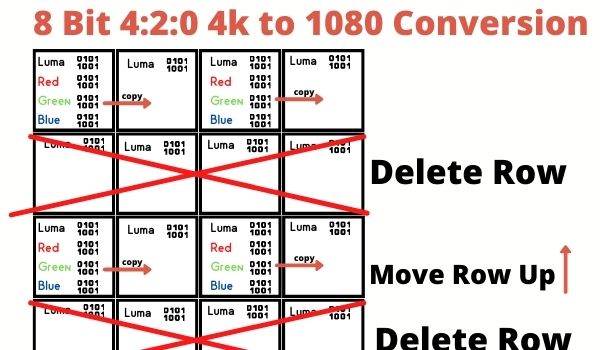
If that looks familiar, it’s because just deleting every other row transforms our 4:2:0 4k picture into a 4:2:2 1080p picture! Wow!
What I’m saying is, if you’re not watching this content on a 4k television and there’s no extra loss happening on the conversion to 1080 or smaller, there’s not going to be a noticeable difference in the picture you end up viewing.
3) Your Encoding May Ruin Everything
Say I film a 10-bit 4:2:2 4k video. Then I save off a frame as a .jpg file to share over the Internet. What did compressing that image to a jpg do to the subsampling?
Compression does all sorts of stuff to the image. That’s why I’m unable to show you side-by-side examples in this blog post. The same goes for if I tried to show this off over YouTube (they compress your videos too).
Can You Ever Tell The Difference Between 4:2:2 and 4:2:0?
Yes, there are two scenarios in which I think there will be a very noticeable difference in how you filmed your shot. The first is with green screen footage
1) Green Screen Footage
If we think about this logically it makes perfect sense that a green screen would do better with 4:2:2. Having fewer colors sampled will make it much harder for our editing software to pinpoint the exact location where green stops and our actor begins.
This is why even lighting is so important for your green screen. Your editing software has 4x as many luminance values to work with as it does color values. Inconsistent lighting makes it hard for the computer to tell the foreground and background apart.
2) Color Grading
It also makes a lot of sense that filming in 4:2:2 vs. 4:2:0 would help when color grading. It effectively gives you double the amount of color information to work with in post.
This would be less noticeable if you are using a preset color profile vs. filming in log. With a preset color profile, your camera basically does the color grading for you while filming. No need for the extra color information in post.
What Color Sampling Rate Should I Choose for my Sony A7S III?
This is why I wrote this post to begin with, I wasn’t sure if I should film in 4:2:2 or not. When I film in XAVC HS 4k (Sony’s lingo for h.265 / HEVC), the camera gives me 5 bitrates to choose from.
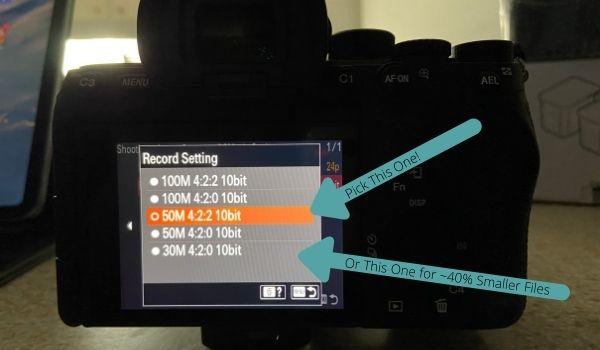
Personally, I’m filming in 50M 4:2:2 10bit. But, if hard drive space was at a premium and I was interested in cutting my file sizes by 40%, I think that 30M 4:2:0 10bit is also a solid option.
But, that’s because after a deep dive, I don’t think you can tell the difference except in extreme scenarios.